DIY- Beautiful Centerpieces
![]()
April 19, 2016
DIY: For the Everyday Bride- Beautiful Centerpieces
Happy Tuesday! If you missed our last post about RWP and Outreach, check it out here.
Today I thought I would post my first DIY. To be perfectly honest, DIY is not something I’m exceptional at. In fact, on a scale of 1-10 in DIY awesomeness I would probably put myself at a 4 or 5 so my DIY posts will be for the Everyday Bride. Ladies like myself who want to create something beautiful for a day full of love, hope and new beginnings.
Let’s DIY together!
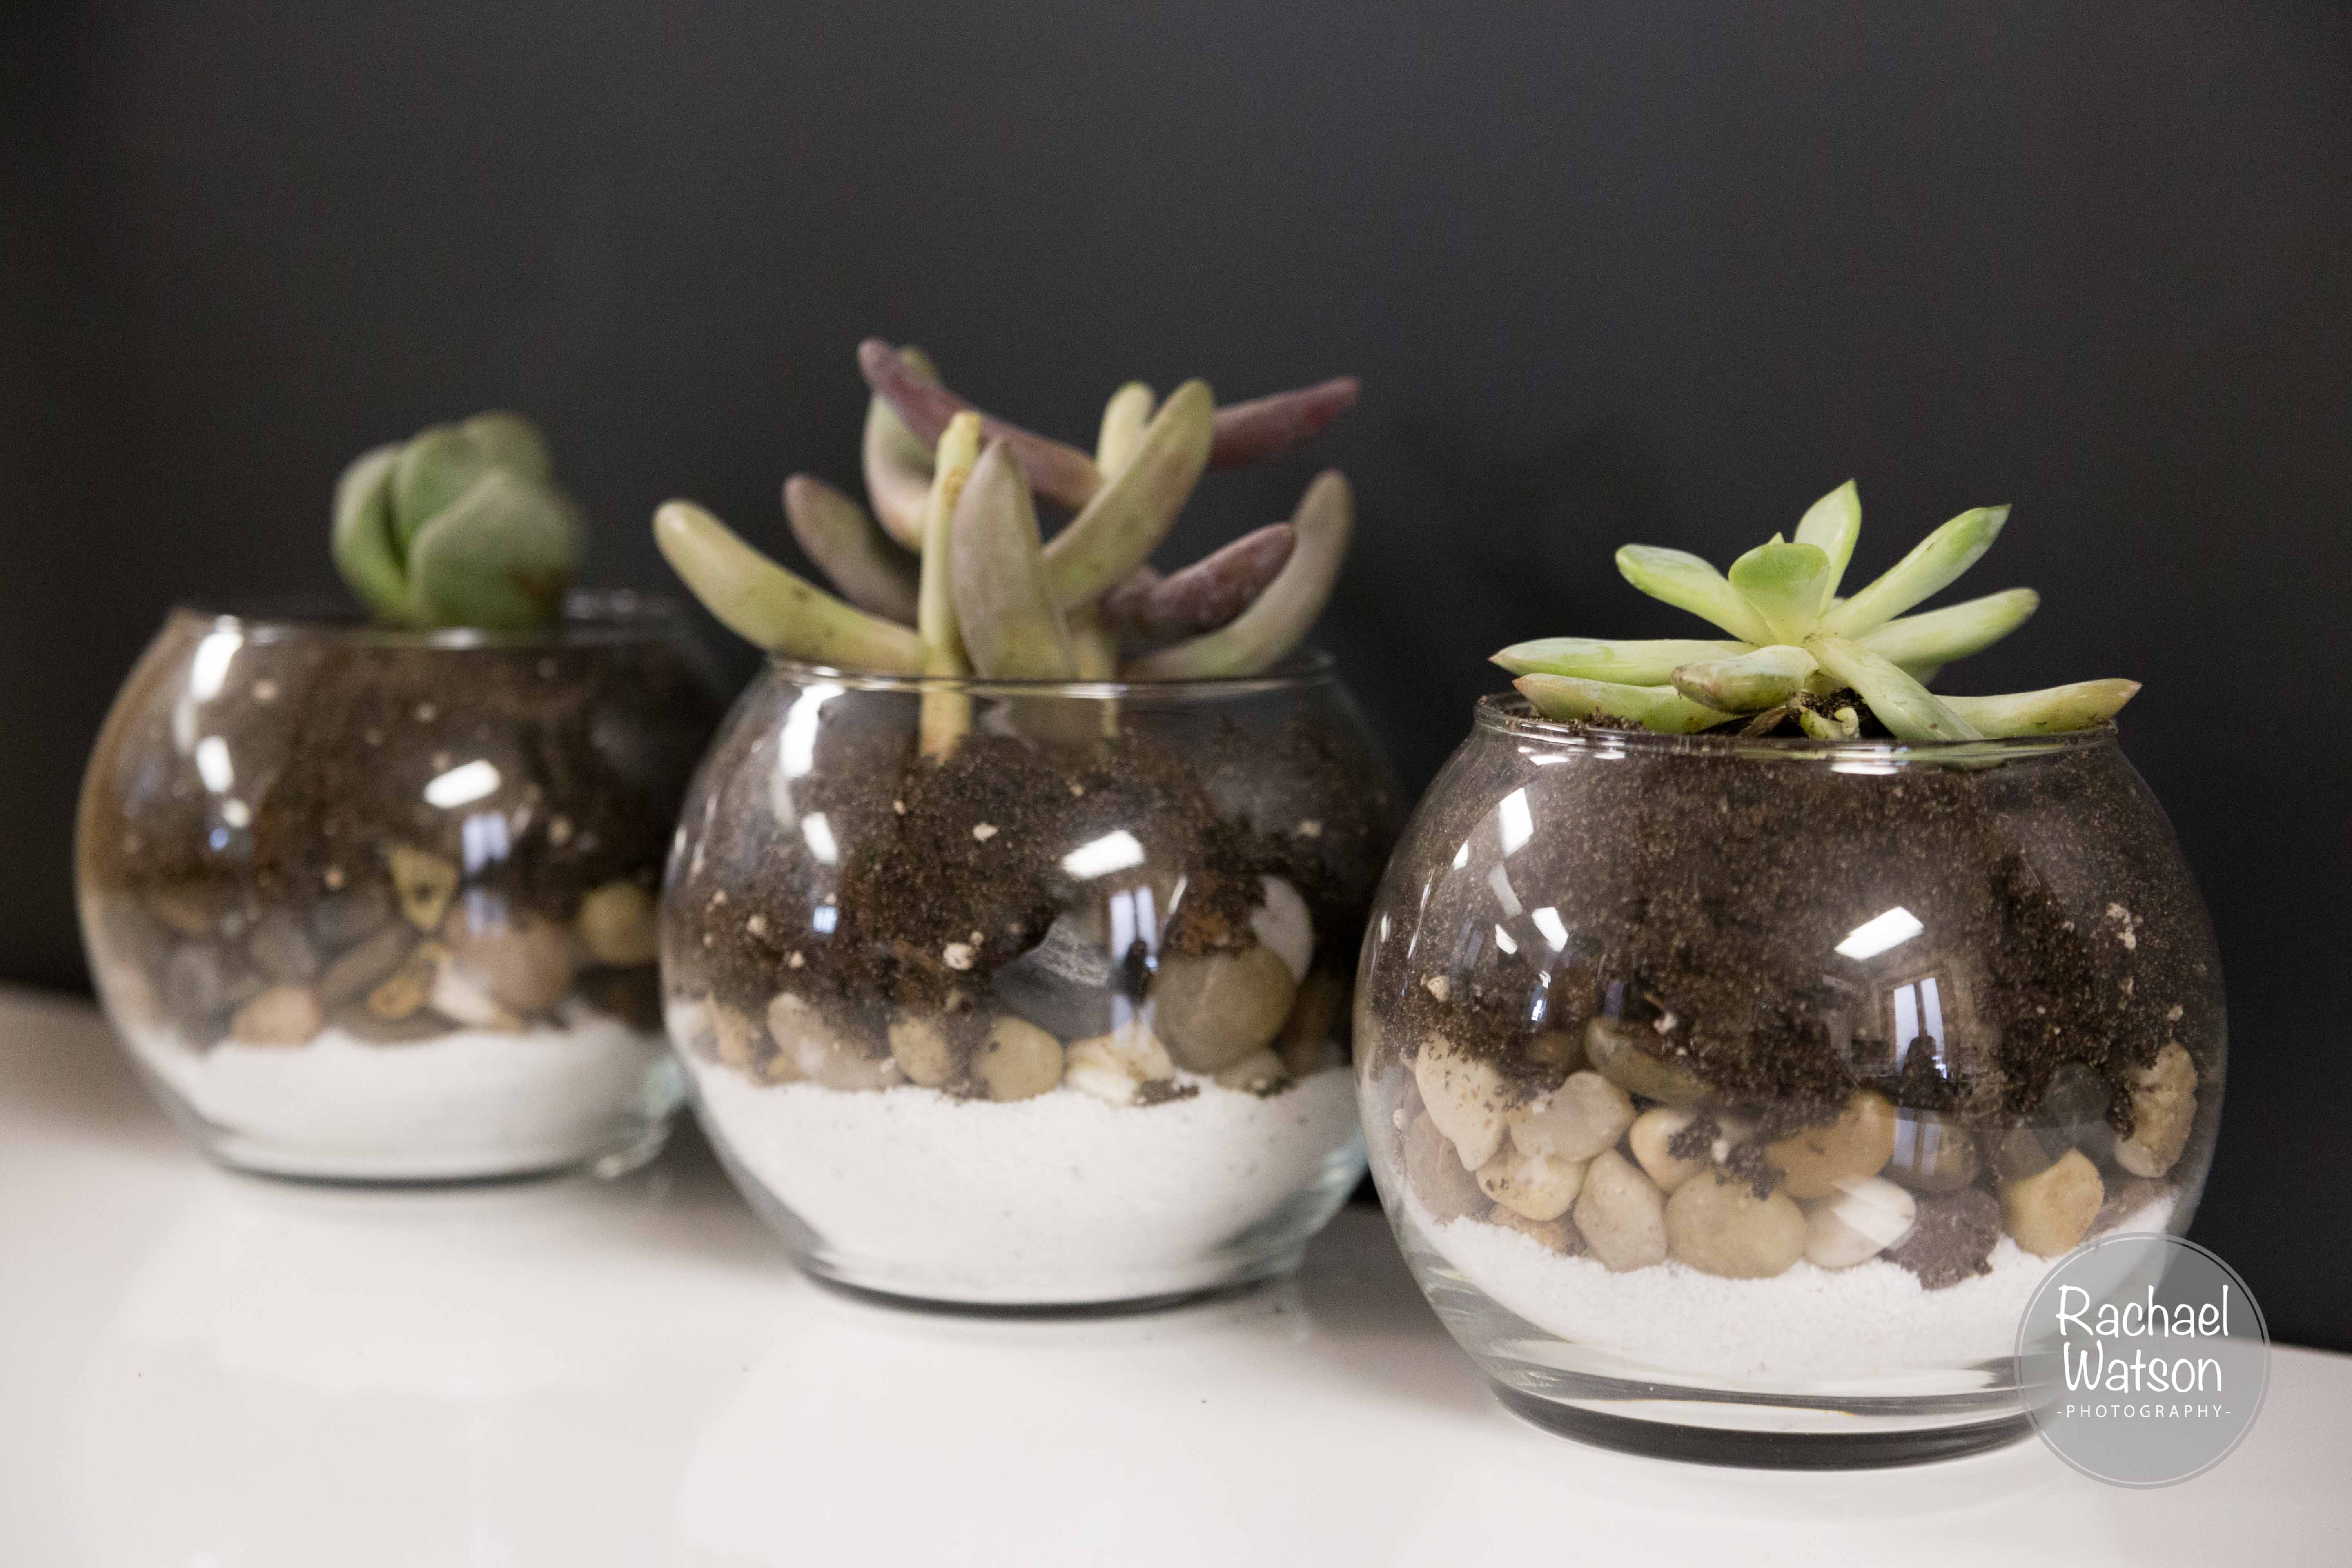
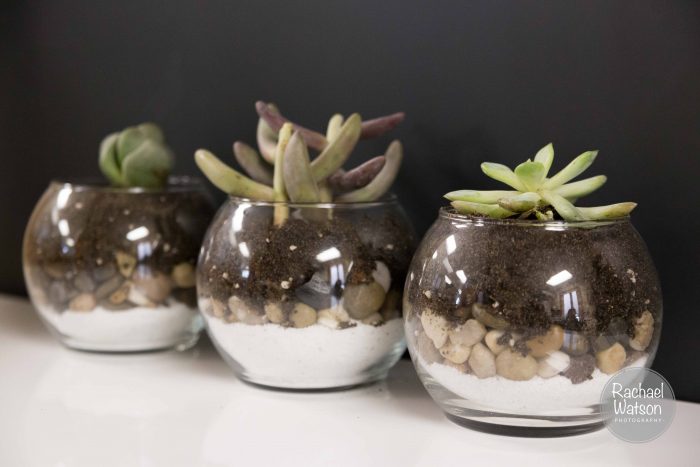
When it comes to centerpieces there are so many beautiful options out there, but my favorite centerpieces are the ones guest can take home with them so my friend and I spent an afternoon together and made succulent terrariums.
I have to say. I really thought this would be an easy DIY to start off with, but as with almost any DIY, it proved to be a little more complicated than expected. Don’t worry, I’ll walk you through all the mistakes we made so you don’t have to make the same ones.
Step 1: Gather your supplies.

To build a succulent terrarium, there are a few things that you’ll need to build it and a few helpful tools.
Word to the Wise: It took us a lot longer to run around and collect everything than we excepted! I mean with some good company and excellent playlist we had fun, but make sure to set aside a good chunk of time to find these things. You may have to go to more than one place to find what you’re looking for.
- Glass bowl/container –Dollar Store
- Succulents –Home Depot
- Dirt –Home Depot
- Rocks –Dollar Store
- Sand –Dollar Store
- Scissors –Home
Glass bowl: This is probably one of the most important parts of the succulent terrarium. We opted to do simple glass bowls, but different containers will give you very different looks. First, we checked out the Dollar Store which offered really good glass for individual succulents. If you’re looking for something bigger, check out Goodwill. You can get so creative here. We went there just to check it out and saw candy dishes, old lanterns, bowls…so many options! If you’re looking for a number of different re-purposed containers, Goodwill is the place to go.
Succulents: When we first got to Home Depot I must have picked up at least 20 different succulents. I was so excited! Here are some things to think about as you gather your favorites. Color pallet. I chose three pastel succulents, but my friend was totally drawn to the brighter ones so that’s what she grabbed. Take your time and get a good visual. If you’re doing larger succulent terrariums, I recommend grouping them in sets of three. The second thing you’ll want to think about is depth. There is not right or wrong way to do it, but it’s something to think about. I tried to find three different pastels. One that spread out more, one taller and all three with different textures.

Dirt: You can purchase dirt from Home Depot, but make sure to get Cactus, Palm & Citrus Potting Mix.
Rocks & Sand: The Dollar Store was perfect for these things! They have little bags of both rocks and sand which worked really well for us. If you’re doing a large number of these for centerpieces Home Depot had bags of rocks & sand which may be better for you.
Word to the Wise: I had no clue you could buy rocks and sand from Home Depot! Their garden section is awesome for this kind of thing. You can get small bags in their decorative garden area or large bags for almost the same price in their outdoor yard area.
Step 2: Lay it out and start to build.
Layer 1: Sand- this gives the terrarium an extra layer of color. You can use plain sand or switch it up to match your wedding colors.
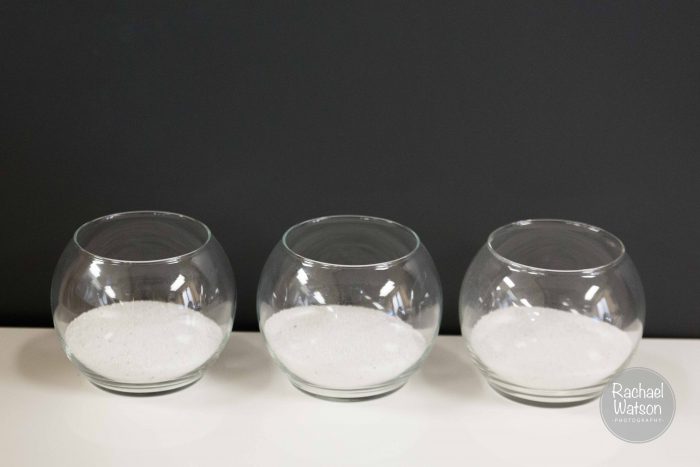
Word to the Wise: Since sand is so fine, it will eventually work its way to the bottom of your terrarium so start with it at the bottom to keep the pretty layers.
Layer 2: Rocks- You’ll want to to a layer of small rocks next so that your succulent terrarium is able to drain excess water.
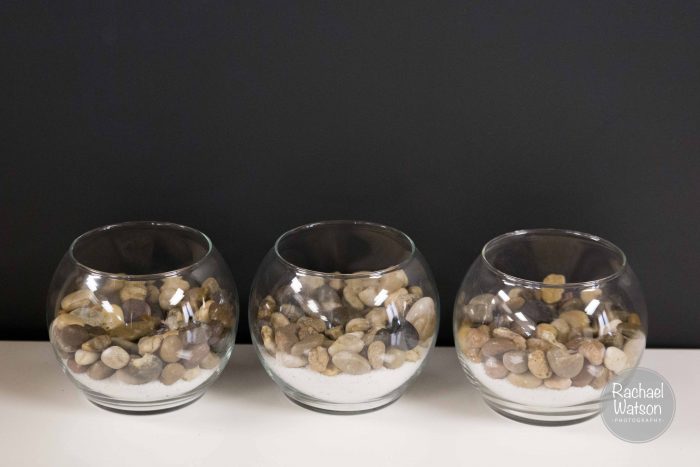
Word to the Wise: Layer the rocks so that they are in a slight bowl shape. This allows the dirt to be a little deeper for the succulents and allows the rocks to remain a layer of it’s own.
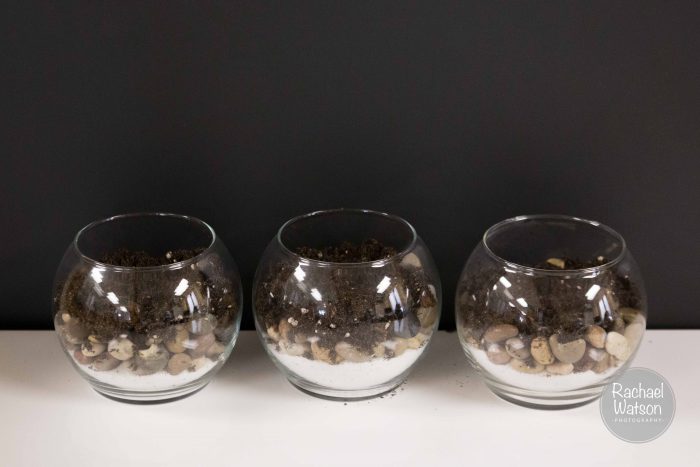
Layer 3: Dirt- While succulents don’t have very deep roots, you’ll want to make sure there is plenty of dirt for them to grow and thrive.
Layer 4: Succulents- Yay! If you’re doing a larger terrarium pick the largest one first, loosen the dirt it came pre-planted in and put it into your new terrarium. Once you have the first one placed, add the next two or if you’re doing individuals, just place them in the middle.
Step 3: Sit back and enjoy
That’s it. You have just completed your first Succulent Terrariums!
Succulent Terrariums are some of my favorite centerpieces you can do. They’re a great take home for your guests because they’re so hearty and if you end up with a couple extra, they’re also great first home décor.
If you liked this Behind the Lens post, let me know! Interested in other DIY projects? Comment below. Thanks and keep your eye out every Tuesday for our Behind the Lens Blog Posts!
Till next time,

READ THE POST
What If it Rains on Our Wedding Day?

READ THE POST
Engagement Session Location Ideas- Nature Backdrop

READ THE POST
Engagement Session Location Ideas- Downtown Chicago

READ THE POST
Mission Impossible & FAQ

read the post
How to Coordinate Your Ceremony Exit

READ THE POST
How to Pop Champagne

popular posts
on the blog


free guide
3 STEPS FOR A MORE PERSONAL ENGAGEMENT SESSION
Shouldn’t your engagement session be as unique as your story? I think so! Get the guide for 3 simple steps to make your engagement session as personal as you.